Apple macOS Developer Guide - from Purchase to Production
- Sharukh Rahman
- MAC os , Electron.js
- January 10, 2024
Table of Contents
Introduction
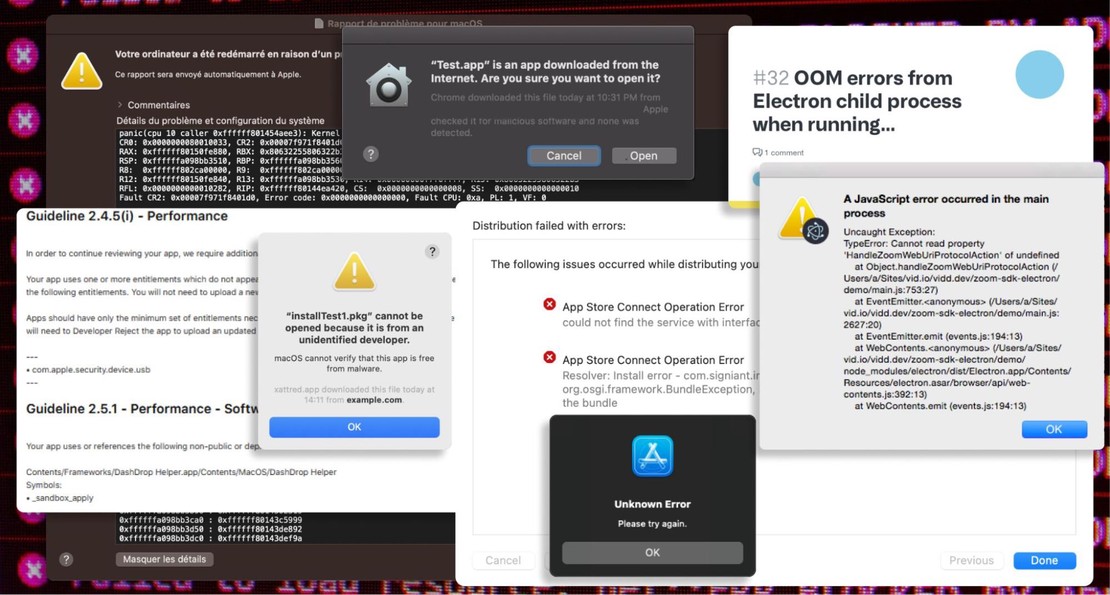
If you are looking to build a macOS App in electron, where the development does not involve the use of Xcode or even building a production build from Xcode-command line tools fails, this blog is for you. Even though Apple has different forms of support and documentation, none of them is going to be this detailed or helpful because, most of the resources concentrated only on native apps. Now speaking of documentation, as of 2023 there is little to no documentation provided by apple, multiple dead-ends in Apple developer forums and trust me I have wasted many days to get a response from the Apple developer support (it won’t be helpful in any way) (why this long, well developer support page most of the time doesn’t have a call option and email will make you wait for 2 to 3 working days) and it drove me nuts. This blog is going to be a long and bumpy ride for some people and a lighthouse for your titanic, so don’t skip if you want to measure thrice, cut once.
Prerequisites
- I assume that you already have an Apple ID in your Mac computer and make sure if you are on the latest OS
(don’t be a Beta user as it will raise unnecessary issues) and download the following.
- Xcode
- Developer
- TestFlight (if you want to test Mac app)
- Transporter (if you want to upload your app to App Store)
- WhatsYourSign (to verify signatures of your build)
- Sign in your Apple ID to all the above apps and in Music go to the account menu and authorize this computer. Check if the trusted devices show up in your Apple ID , devices tab and also in App store account settings → computer authorization → manage devices .
- Edit any details that contain any symbols (should only contain alphanumeric, periods and commas), turn on 2fa, add a trusted phone number, fill out gender and turn on iCloud analytics.
Purchasing the developer membership
(…more )
In this next part, you might encounter some challenges. If things don’t go smoothly, don’t hesitate to give Apple developer support a call. Choose the right topics when calling because there won’t be a transfer to other support staff. Make sure to remember the case ID so you can check back later.
- Proceed by adding only one payment method in the App store, check out the available payment methods
and choose a payment method according to your region. But beware, for some regions only couple of payment methods will work in order to purchase the membership account, so if you are not sure feel free to contact the Apple developers support
and select
Membership and Account → Program purchase and renewal
and make a quick call. If you are sure, then go to App store
account settings → manage payments
and go through your preferred payment method process.
Info
At this point, you are just adding a payment method and not making any payment. If your payment process insists on adding funds then something is wrong with the process so just skip it, because you have only a 50% chance of purchasing using Apple ID funds that too using an iPhone so don’t risk it. In India, only UPI payments with mandate will be supported to purchase the membership account as of now.
- Now we’re about to make the purchase, as shown in the above image try purchasing on an iPhone first, if this fails, or you don’t have any of the above devices then try on a Mac computer, open the Developer application and go to
account → enroll
. This will ask all the authentication and details, and then it’ll ask about mode of registration (If you are registering as an individual the membership account process will be faster and if you are registering as an organization then you’ll be needing a DUNS
number, and it’ll take longer time for the purchase) and it will proceed to payment, with the exact fees showing on the screen. Click on buy and turn on automatic payment renewal (if available), if you are using UPI make sure it’s on mandate payment mode.
Tip
While payment you shouldn’t be entering the fee you’ll be asked to pay with the exact amount, else contact the Apple developer support. If you encounter with the infamous ‘unknown error‘ while clicking on the enroll button, check your data across your Apple ID
payment methods → View details and click on copy billing address checkbox, App store account settings and your system preferences and make sure everything is similar down to a period.
- After a successful purchase, you will receive a mail regarding your payment, and check your status
. Usually it says to wait for 24–48 hours to confirm, but sometimes it’ll reflect in a couple of hours. If you are unsure about the payment status, then visit here
and see if your payment is listed.
Note
If it takes more than 48 hours, contact the Apple developer support for the delay, usually they will ask for user’s ID proof for further verification.
- Agree your Apple Developer Agreements
to proceed further.
Warning
There are some people who offer services just to purchase an account for you, don’t fall for the trap.
The Basics
There are three ways to export your electron app.
- The macOS App Store build (MAS).
- Distribute your app outside macOS App Store (External distribution).
- Development build to distribute for internal testing.
Electron-Builder
(…more )
This module is a Swiss army knife when it comes to building electron apps, basically this alone will handle signing, notarizing, stapling and building your desired targets for Windows, Mac and Linux desktop apps. I assume that you have a basic electron-builder config file, and if you already know there is a Mac configuration (App config) and the configuration for each installer (Installer config). If you look closely into the output folder of your build you can see a path like Mac/yourappname.app (App part) and your preferred installer like pkg, zip, dmg (Installer part). Just make sure to head to this link, to get started.
Note
If you are new to building desktop apps you need to understand how a typical macOS app is structured, if you download a Mac app setup from the browser you will get a setup file (Installer) and you will go through some steps to install the application (App).
Signing
(…more )
Refer to this link as there are 5 types of certificates that are used for different scenarios explained here . You also need a valid Provisional Profile, if not you can sign only for your Mac computer and Gatekeeper will allow the app only for this computer alone!
There are two types of profiles,
- If you want to distribute your app for internal testing across your team’s Mac computer then, create using Apple Developer certificate and add the devices you want to distribute.
- If you want to distribute your app to production, then create using Apple Distribution certificate.
Note
If you add all the certificates in your ‘login’ keychain access, then the electron-builder will handle signing based on your target. Sometimes electron-builder will get hiccups when finding the right certificate for your target, if so follow this
link and electron-builder will take the exported certificates based on your environment variable, if this doesn’t work then create a custom keychain and transfer all related certificates from ‘login’ keychain to your keychain, then set your custom keychain path to CSC_KEYCHAIN environment variable or set identity parameter in your electron-builder.yml config file. If the problem persists, then do export CSC_IDENTITY_AUTO_DISCOVERY = false and repeat the same.
Check out a well written medium article by Bing Kuo.
Notarizing and Stapling: (only for external distribution)
(…more )
Notarizing is a process of uploading an app to Apple’s Notary Service, and it will check if your app has a valid certificate and provides a ticket if the app passes all the security checks. There are 5 ways to notarize an app. Out of which 3 are supported by the latest Xcode version and out of 3 only 1 method is reliable, safer and faster way to get your app notarized. Stapling is a final step before building, which staples the ticket and the app so that Apple’s Gatekeeper service will allow this app on foreign Mac computers even when they are offline.
Tip
If Electron-Builder can’t able to pick your environment variables then you can use @electron/notarize , write a JS script, place it into your build folder and add this file path using afterSign hook (refer here ) and remove the notarize parameter under MacConfiguration in your electron-builder.yml config file. Do not use external signing apps like sd-notary , all these will fail eventually, and you can’t trust what they sneak in.
Info
If you are building an app for Mac App Store then you need to sign but not to notarize and staple because the app store will take care of it instead. If you want to distribute the app outside the store then you need to sign, notarize and staple.
Note
Note from Electron-builder: In order to activate the notarization step, You MUST specify one of the following via environment variables:
- APPLE_API_KEY, APPLE_API_KEY_ID and APPLE_API_ISSUER (Recommended).
- APPLE_ID and APPLE_APP_SPECIFIC_PASSWORD
- APPLE_KEYCHAIN and APPLE_KEYCHAIN_PROFILE. For security reasons, it is recommended to use the first option (see issue here ).
Prepping
Gather all developer certificates
- Go to
Xcode → settings → accounts tab → Manage certificates → (+)
button and click on all the listed certificates. This will automatically install in your Xcode, “login” keychain, and it will reflect in your certificate tab of the above link, all in one click.

Installing certificates using Xcode - Go to
keychain application → “login” keychain → certificates
and check whether all the certificates you installed previously are present.

Installed certificates in keychain-access app Note
If you don’t have Apple Worldwide Developer Relations certificate and Mac OS X Provisioning Profile Signing certificate, then go to Apple Certificate Authority and download the latest Worldwide Developer Relations certificate and drag and drop to your “login” keychain. This will automatically install the Mac OS X Provisioning Profile Signing certificate.
- Verify whether all your certificates which you have installed show up here .
Stuff needed for notarizing: (Perform any one of the methods) (Only for external distribution)
- (Recommended Method)
Involves apple API Key (absolute path of .p8 file), Apple API Key ID and Apple API Issuer and all of this can be obtained by creating a key in “Keys” tab in App Store Connect
. This is pretty straight forward, just create a certificate with “Admin” access. Then download the certificate and also store the “Issuer ID” and “Key ID” somewhere safe.

AppStoreConnect API certificate - Involves Apple ID, Apple ID Password generated by App Specific Password in Apple ID , go-to Sign-In and Security → App Specific password and the team ID which you can get this from Membership Details in your Apple Developer Account .
- Involves keychain name/path to the keychain where you have stored credentials in and keychain Profile which is the name of the keychain (login as default).
Identifiers, Devices and Profiles
- Go to this link, in Identifiers tab and create a new identifier called “App IDs” then choose the “App” type and finally register your app by providing description, the “Bundle ID” should be in reverse-domain name style format, choose necessary “App Capabilities and Services” then click on continue and finally create your identifier.
- Go to Devices tab and register your devices, to find the device’s UUID, go to System Information app → Hardware and copy the “Hardware UUID”.
- Finally, go to Profiles tab and if you want to distribute apps for testing, use “macOS App Development” development provisioning profile or if you want to distribute apps for production, use “Mac App Store” distribution provisioning profile. Choose the “App ID” which was created in the Identity section and select preferred certificate based on your use case that you have created in the certificate section finally if asked to add devices for development use case then add them and create a provisioning profile and download the profile.
Create an App Record: (Only for MAS build)
(…more )
Go to this link and create a “New App” and choose desired platform and give your app a name and then choose the “Bundle ID” which we have created in Identifier section then choose a “SKU” as a unique ID for your app and finally choose your desired “User Access” and click on create button.
Tip
If your app has a login page, create a test credential for the apple review team and fill this form which is located in the main product page of your app. This will make the review process easy and faster for you.

Building
Entitlements
(…more )
Create entitlements.inherit.plist file in your ‘buildResources’ folder and add the following. (for all builds)
entitlements.inherit.plist
 1<?xml version="1.0" encoding="UTF-8"?>
 2<!DOCTYPE plist PUBLIC "-//Apple//DTD PLIST 1.0//EN" "http://www.apple.com/DTDs/PropertyList-1.0.dtd">
 3<plist version="1.0">
 4<dict>
 5	<key>com.apple.security.app-sandbox</key>
 6	<true/>
 7	<key>com.apple.security.inherit</key>
 8    <true/>
 9</dict>
10</plist>
Create entitlements.mas.plist and add the following. (only for MAS builds). Don’t forget to add your team ID and the Bundle ID that you’ve created before.
entitlements.mas.plist
 1<?xml version="1.0" encoding="UTF-8"?>
 2<!DOCTYPE plist PUBLIC "-//Apple//DTD PLIST 1.0//EN" "http://www.apple.com/DTDs/PropertyList-1.0.dtd">
 3<plist version="1.0">
 4<dict>
 5	<key>com.apple.security.cs.allow-jit</key>
 6	<true/>
 7	<key>com.apple.security.cs.allow-unsigned-executable-memory</key>
 8	<true/>
 9	<key>com.apple.security.cs.allow-dyld-environment-variables</key>
10	<true/>
11	<key>com.apple.security.app-sandbox</key>
12	<true/>
13	<key>com.apple.security.application-groups</key>
14	<array>
15		<string>ABCDE12345.com.your_company.your_app</string>
16	</array>
17	<key>com.apple.application-identifier</key>
18	<string>ABCDE12345.com.your_company.your_app</string>
19	<key>com.apple.developer.team-identifier</key>
20	<string>ABCDE12345</string>
21	<key>com.apple.security.files.bookmarks.app-scope</key>
22	<true/>
23	<key>com.apple.security.files.bookmarks.document-scope</key>
24	<true/>
25</dict>
26</plist>
Create entitlements.mac.plist and add the following. (only for the external distribution and development)
entitlements.mac.plist
 1<?xml version="1.0" encoding="UTF-8"?>
 2<!DOCTYPE plist PUBLIC "-//Apple//DTD PLIST 1.0//EN" "http://www.apple.com/DTDs/PropertyList-1.0.dtd">
 3<plist version="1.0">
 4<dict>
 5	<key>com.apple.security.cs.allow-jit</key>
 6	<true/>
 7	<key>com.apple.security.cs.allow-unsigned-executable-memory</key>
 8	<true/>
 9	<key>com.apple.security.cs.allow-dyld-environment-variables</key>
10	<true/>
11</dict>
12</plist>
Add the below entitlements if you are using network calls. (not for the entitlements.inherit.plist)
1<key>com.apple.security.network.client</key>
2<true/>
3<key>com.apple.security.network.server</key>
4<true/>
Add the below entitlements if you are accessing storage. (not for the entitlements.inherit.plist)
1<key>com.apple.security.files.downloads.read-write</key>
2<true/>
3<key>com.apple.security.files.user-selected.read-write</key>
4<true/>
5<key>com.apple.security.device.usb</key>
6<true/>
Add the below entitlements if you are accessing microphone, camera and audio input. (not for the entitlements.inherit.plist)
1<key>com.apple.security.device.microphone</key>
2<true/>
3<key>com.apple.security.device.camera</key>
4<true/>
5<key>com.apple.security.device.audio-input</key>
6<true/>
Generating ICNS
(…more )
For distribution in the Mac App Store, the transporter app needs a .icns file which includes at least 512 x 512 and a 512×512@2x image. For this you will need a 1024×1024.png logo and use the below command to generate the .icns file and iconset folder.
1curl "https://gist.githubusercontent.com/Zedbyte-corp/bf62eccfe4e91a05bc7251deacbd9609/raw/2faf0f579afdb45a5c9f9e7e922826b6f43704c4/icnsGenerator.sh" | bash -s icon.png
The following table describes the files produced by executing the above command.
| Filename | Resolution (pixels) | Density (PPI) |
|---|---|---|
| icon_16x16.png | 16x16 | 72 |
| icon_16x16@2x.png | 32x32 | 144 |
| icon_32x32.png | 32x32 | 72 |
| icon_32x32@2x.png | 64x64 | 144 |
| icon_128x128.png | 128x128 | 72 |
| icon_128x128@2x.png | 256x256 | 144 |
| icon_256x256.png | 256x256 | 72 |
| icon_256x256@2x.png | 512x512 | 144 |
| icon_512x512.png | 512x512 | 72 |
| icon_512x512@2x.png | 1024x1024 | 144 |
Note
If your app tries to sign with wrong certificate (usually this happens if you have certificates from multiple account), then as discussed, refer to this . The ‘extendInfo’ parameter will insert values to the Info.plist file. If ‘notarize’ parameter cant get the environment variables, then refer to this .
Electron builder config
Add your scripts, icns file, provision profile and certificates into electron-builder config and your config now somewhat looks like this.
electron-builder.yml
 1appId: com.your_company.your_app
 2productName: your_app
 3directories:
 4  buildResources: build
 5files:
 6  - "!**/.vscode/*"
 7  - "!src/*"
 8  - ! {
 9      .eslintignore,
10      .eslintrc.cjs,
11      .prettierignore,
12      .prettierrc.yaml,
13      dev-app-update.yml,
14      CHANGELOG.md,
15      README.md,
16    }
17  - "!{.env, .env.*, .npmrc, pnpm-lock.yaml}"
18asarUnpack:
19  - resources/**
20mac:
21  target:
22    - mas
23    - dmg
24  type: distribution
25  provisioningProfile: build/Dashdrop.provisionprofile
26  # type: development
27  # provisioningProfile: build/DashdropDev.provisionprofile
28  hardenedRuntime: true
29  gatekeeperAssess: true
30  notarize:
31    teamId: ABCDE12345
32  icon: build/icon.icns
33  category: public.app-category.your_category
34  entitlements: build/entitlements.mac.plist
35  entitlementsInherit: build/entitlements.inherit.plist
36  extendInfo:
37    # ITSAppUsesNonExemptEncryption: false
38    LSMultipleInstancesProhibited: true
39    NSApplicationDelegate:
40      applicationSupportsSecureRestorableState: true
41mas:
42  entitlements: build/entitlements.mas.plist
43  entitlementsInherit: build/entitlements.inherit.plist
44dmg:
45  sign: true
46# afterSign: build/afterSign.js
47npmRebuild: false
48electronLanguages:
49  - en-US
Note
If your app tries to sign with wrong certificate (usually this happens if you have certificates from multiple account), then as discussed, refer to this. The ‘extendInfo’ parameter will insert values to the Info.plist file. If ‘notarize’ parameter cant get the environment variables, then refer to this.
Folder Structure
Refer to the folder structure below, make sure that path referred inside the electron-builder config is same as your folder structure.
.
├── build/
│   ├── iconbuilder.iconset/
│   │   └── ...
│   ├── distribution.provisionprofile
│   ├── development.provisionprofile
│   ├── afterSign.js
│   ├── entitlements.mac.plist
│   ├── entitlements.mas.plist
│   ├── entitlements.inherit.plist
│   ├── icon.icns
│   └── 1024x1024.png
├── resources
├── src/
│   ├── main
│   ├── preload
│   └── renderer
├── .env
├── electron-builder.yml
└── package.json
Verify and Distribute
Finally, you can exhale, now I just assume that the build was successful, and you are on the verge of uploading the app to transporter or distributing the app outside the store. If you are about to upload your MAS build to transporter, I’d advise you to create a mas-dev build and test it thoroughly. To verify the signature, right-click the production installer, and you will see a ‘Signing Info’ menu from WhatsYourSign app. Refer to signing to check whether your build is signed with respective certificates. That’s it folks, now you can distribute your external distribution build or upload your MAS build to transporter without any errors. If any error occurred, then check FAQ’s section.
FAQs
Set export DEBUG=true in your environment variables.
Set export DEBUG=electron-notarize* in your environment variables.
Use this if and only if you use this @electron/notarize .
Type the command sudo xcodebuild -license in your Terminal.app
Type the command security find-identity -p codesigning -v in your Terminal.app.
To find all certificates type security find-identity -p.
Add the following in both parent and child entitlements.
1<key>com.apple.security.cs.allow-unsigned-executable-memory</key>
2<true/>
Check your internet connection and maybe disable your Mac firewall in your Internet settings (there’s a chance that your system may block the signing server or IBM’s Aspera ports), or allow ports using Little Snitch Tool for notary service, else it’s a problem with Apple Signing Servers, which you can check system status here .
Conclusion
Submitting your app for review may take up to 2 to 4 working business days, just keep in mind that you provide enough information for the apple internal tester for a successful testing (especially for your entitlements). That’s it guys, I hope that everything has gone well, and I hope that this blog will shed some light to electron developers out there and best of luck for your future endeavours!.